How to Use Mailchimp | Everything You Need to Know
If you click to purchase a product or service based on our independent recommendations and impartial reviews, we may receive a commission. Learn more
Despite the fact that email marketing has been around the block a few times, it’s certainly nowhere near retirement. In fact, it remains one of the most effective marketing strategies out there, and comes with a killer reputation for delivering a blistering return on investment (ROI).
We don’t blame you for wanting to get a taste of what email marketing has to offer, and Mailchimp is one of the easiest ways to do it. Over 7,000 companies already use the platform to execute their email marketing strategies, and it’s easy to see why. In our research, Mailchimp came top of the pack for its content, functionality, and marketing tools, scoring a very impressive 4.5 out of 5 overall.
In this article, we’ll show you how to use Mailchimp, covering everything from registering your account, to automating your email sends. Our free step-by-step guide will cut through the monkey business, and before you know it, you’ll be going bananas for Mailchimp (sorry, we couldn’t help ourselves)!
What Is Mailchimp?
In case you didn’t know, Mailchimp is a marketing platform that specializes in using email to help businesses communicate and build relationships with their customers. It’s a great solution for anyone looking to scale their email database, and also provides the option of using automation to make maintaining a large email list more manageable.
One of the main reasons that Mailchimp is so popular is that you can do everything from its one platform. From managing your email lists to creating email templates, and even engineering larger sending sequences, Mailchimp brings all aspects of email marketing under one roof.
And, although it might have started off that way, Mailchimp doesn’t just offer email marketing anymore. Over the past few years, it’s grown to offer an all-around marketing experience, giving users access to Facebook ads, Google Remarketing ads, social posting, marketing CRM tools, and much more.
Even better, you don’t need to download any software to get started. Mailchimp is web-based, which means you only need its website address and an account to get started.
Mailchimp Pros and Cons
| Pros | Cons |
|---|---|
| Wide Range of Integrations It integrates with 41 different apps to boost the functionality of your email marketing strategy. | The More You Grow, the More You Pay Mailchimp’s plans are based on contact numbers, so if you have a large list, you’ll have to pay more. |
| Advanced Marketing Tools Personalization, automation, analytics – there’s a reason Mailchimp got the highest score (4.8/5) in our marketing tools research category. | Its Free Plan Can Be Underwhelming The free plan isn’t as generous as those offered by its competitors, and you won’t be able to use automation or A/B testing. |
| Free to Get Started Mailchimp offers a free plan, so you can start sending without spending a single cent. | Clunky Editor and Dashboard Mailchimp isn’t hard to use, but the editor and dashboard aren’t initially as intuitive as they could be. |
Further Reading
Want to find out more about how good Mailchimp really is? Check out our Mailchimp Review for our expert insights into one of the industry’s most popular email marketing platforms.Mailchimp User Reviews
It has a very intuitive interface which is great. New users could be deterred from maximizing their use of features if the interface was overly complicated. It has excellent email automation options that are easy to understand, too.
How has it helped to grow your business?
The platform has allowed us to create customized and automated emails for different purposes, including a newsletter. More importantly, it allowed us to organize our audience by segments, groups, and tags, meaning we can deliver more engaging content to the right people.
Is there anything you dislike?
I think Mailchimp is a bit limiting for big companies. For example, the platform doesn’t have an advanced analytics feature – a must-have in this day and age. Its most important features require a subscription, which may be a limiting factor for small businesses that just want to get started.
What advice would you give to new users just starting out with Mailchimp?
Remember that its free plan can only take you so far, so you may have to spend some money to access more features. However, it’s still an accessible and straightforward tool for those small businesses looking into AI/marketing automation.
Would you recommend Mailchimp?
I would recommend it if you’re a small business, your budget is limited, or you want to start personalizing your content to get better results from your audience.
 Ryan Novak is the owner of Chocolate Pizza Company Inc., now Central New York’s largest chocolate maker. He holds a B.S. in Entrepreneurship and Emerging Enterprises from Syracuse University’s Whitman School of Management. Ryan started with Chocolate Pizza Company as a dishwasher at age 15. He became the owner in 2010 at the age of 21. Since then, he has grown the small-town chocolate shop into an emerging national brand with features on Food Network, Discovery, Hallmark Channel, CNBC, Forbes, People, and Entrepreneur magazines.
Firstly, Mailchimp integrates with our ecommerce platform (WooCommerce) so that I can automatically build my customer email list with every online order. Additionally, it’s easy to use.
I can put together a campaign in about 15 minutes – that efficiency is valuable to me as a small business owner. Plus, there is a fair amount of feedback information available regarding campaign performance and success.
How has it helped you grow your business?
We use Mailchimp email campaigns primarily to promote seasonal products and to send updated information to wholesale accounts. We try to avoid saturating our audience with too many emails, but keeping in front of customers is important in a market as competitive as gourmet gifts.
Being able to segment our audience into different categories is very useful – we have a retail customer list, wholesale client list, corporate customer list and so on. Beyond the obvious gift-giving around major holidays, Mailchimp helps us stimulate off-peak sales by suggesting reasons why now is a good time to order for things like back-to-school, get well, graduations, birthdays, and other occasions.
Is there anything you dislike?
Mailchimp plans are based on the size of your audience, but finding what those breakpoints are and then cross-referencing those numbers with the monthly rates is not easy. More transparency on billing structure would be helpful.
What advice would you give to new users of Mailchimp?
Mailchimp is useful as one part of a multi-pronged marketing strategy. Don’t put all your eggs in any one basket – diversify your marketing approach. Less is more with this resource. If customers feel you are saturating their inbox with pitch after pitch, then they will quickly unsubscribe from your list.
Also, I’d recommend using more images and less text in your emails. Let quality images capture customers’ attention – no one wants to see a wall of text, so don’t clutter your campaigns with a narrative no one will read. You have a few seconds to pique their interest and get them to your website, so images – not words – are the key.
Would you recommend Mailchimp?
Yes, as a small business owner this is a resource that is cost effective, easy to use, and produces measurable results.
 Heather Kieta is the marketing manager for Grubby Cat, a website that aims to help cat owners get to know their new pets.
It’s relatively simple to use. It walks you through how to do everything, as if every time is someone’s first time. I was not well-versed in development or even HTML when I was using Mailchimp for marketing purposes, but still found it painless to get the content out when needed. I also like that you are able to see the open and click-through rates of your emails. This helps you understand what you are doing right and wrong. Finally, it’s great that you are able to easily import and export subscriber email lists.
How has it helped you grow your business?
It helped in a lot of ways. One of the biggest things that businesses fail to do nowadays is keep customers and subscribers updated on the progress of their project or company. I was working as part of a startup, and being able to keep our users engaged and a part of the project was something that Mailchimp was invaluable for.
It also helped us to get our updated videos out. Our YouTube channel only had about 1,000 subscribers, but was still getting between 10- and 20 thousand views every video because Mailchimp allowed us to reach out and inform our already established base that a new video had been uploaded.
Is there anything you dislike?
While I ultimately love the UI of Mailchimp, sometimes it can be a little difficult to get borders and newsletter designs looking good. For a basic email newsletter, it was great, but there were times I wanted to fit some images in specific sectors of the newsletter, and they didn’t make it easy to do so. This is where some experience with HTML would come in handy.
What advice would you give to new users of Mailchimp?
Try it out! It’s a great platform for anyone who has never managed a newsletter or email list before. It really helps you understand the process involved, and prepares you for further engagement opportunities in the future on many different platforms.
Would you recommend Mailchimp?
I would! It’s a great platform for beginners.
#1. Registering With Mailchimp
- How to register with Mailchimp
- Mailchimp’s pricing plans
- Finding your way around the Mailchimp dashboard
Creating a Mailchimp Account
The first step on your email marketing journey is the simplest one – setting up your Mailchimp account! Head to the Mailchimp homepage, and click on the green ‘Sign Up Free’ button in the top right corner. This will direct you to a welcome page where you can enter your email, a username, and a password to create your account.
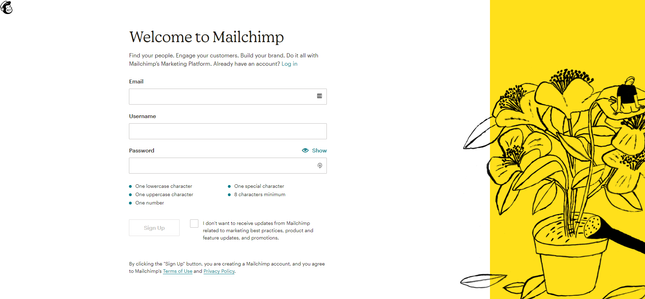
You’ll then be sent an email to activate your account. You need to open this before you can continue with the setup, but once you’ve clicked on the ‘Activate Account’ button within the email to confirm your identity, you’ll be redirected back to Mailchimp.
Choosing a Pricing Plan
Mailchimp offers a number of pricing plans. Each one is based on the number of contacts you’re planning to store. The more contacts you have on your list, the more expensive your plan will be.
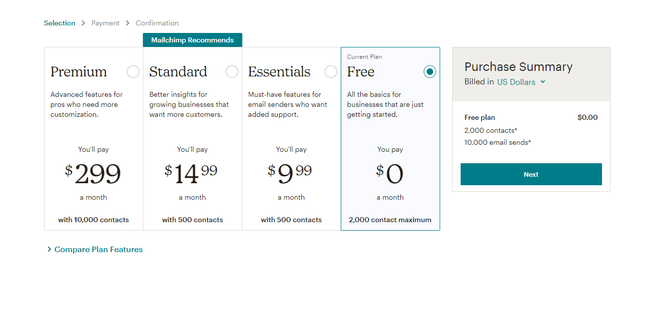
If you have a strict budget to stick to, Mailchimp does offer a free plan. This will allow you to store up to 2,000 contacts without spending a cent. Whilst this is great if you’re just starting out, we wouldn’t recommend sticking with it in the long run. It’s quite restrictive, and its features are relatively basic.
If you want the most value for money, we think that the Standard plan is your best bet. It’ll set you back $14.99 per month, but offers a decent set of features in return. However, before we get too carried away, we should point out that picking a plan with Mailchimp isn’t as simple as just selecting the one you want.
That’s because its pricing structure works on a sliding scale. This means that the prices displayed are the starting prices, and only cover the minimum number of contacts allowed. For example, the $14.99 price attached to the standard plan applies to 500 contacts. If you need closer to the plan’s 100,000-contact limit, you’re going to need to pay a much larger sum.
To work out exactly how much your plan will cost, you can use Mailchimp’s calculator. Simply choose the plan bracket you’re interested in, and then use the sliding scale to select your contact threshold to generate your monthly cost.
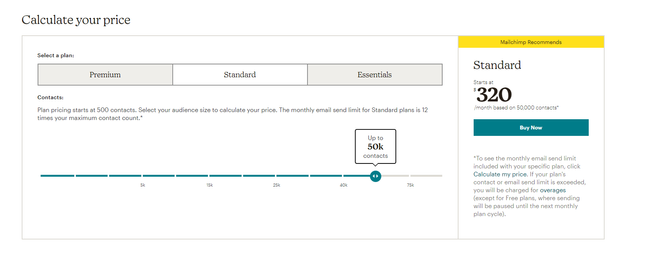
When you’ve chosen a plan and you’re happy to continue, click ‘Next’ to move on to setting up your account.
Setting Up Your Account
Mailchimp needs a few more details to finish setting up your account. You’ll need to enter your name, business name, and address as a minimum, but there’s also the option to add your website URL and phone number if you wish to.
It might surprise you, but email marketing is governed by a set of pretty strict rules. Mailchimp needs to record a physical address for you to make sure your emails comply with international anti-spam laws. Adhering to these regulations is a good idea, because it helps to protect Mailchimp’s reputation as an email sender. That means that your emails are less likely to land in your subscribers’ junk folders!
Once you’ve added in these final details, Mailchimp will ask whether you already have a list of email contacts. If you answer yes, it will provide you with a drop-down list so you can specify how many contacts you have. If the answer is no, you can click ‘Continue’ straight away.
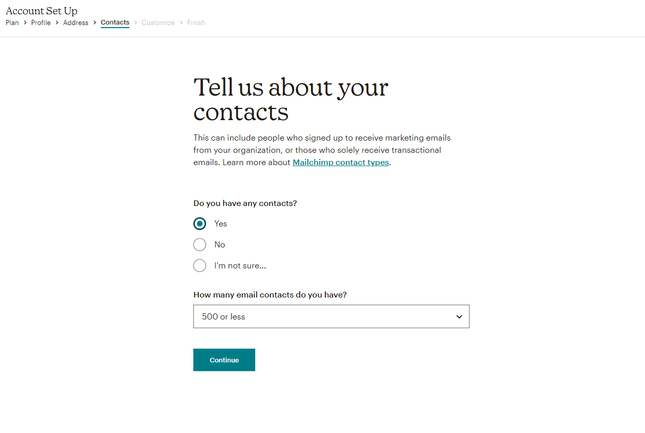
Congratulations – you’ve almost finished the sign up process! There’s just one more step to go, and it’s a quick one. Mailchimp will ask whether you sell products or services online, so that they can determine the best experience for your business. They’ll also ask how you currently sell online. Select the options that apply to you and then click ‘Continue’. Alternatively, you can skip this step if you’d like to.
Finding Your Way Around the Mailchimp Dashboard
Once you’ve created your account, you’ll be taken to your Mailchimp dashboard. Here, you’ll be encouraged to connect your store to one of Mailchimp’s many integrations. This is something we’ll cover in more detail below, so for now, we’d recommend just focusing on familiarizing yourself with the dashboard.
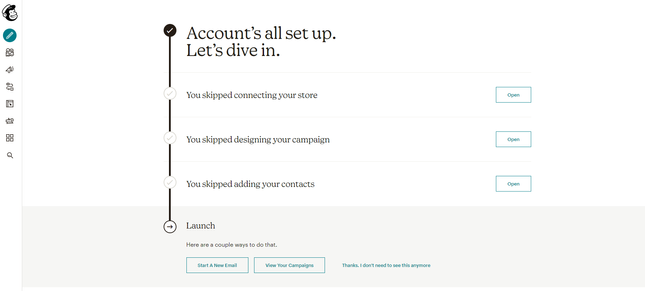
The most important part of your dashboard is the left-hand toolbar. This contains the various tabs you’re going to be using when you start building your email marketing strategy. Here’s a quick run-through of what they are and what you can use them for:
- Create
This is exactly what it sounds like – the place where you can create parts of your email marketing strategy, including emails, templates, customer journeys, landing pages, and multi-channel designs.
- Audience
Use the Audience tab to manage your contact lists. You can also import existing contacts here, and create signup forms, segmented lists, surveys, and tags.
- Campaigns
Here, you can view and manage your existing campaigns, as well as access performance reports.
- Automations
This tab allows you to build longer customer journeys, such as welcome sequences or educational series.
- Website
If you choose to build your website with Mailchimp, this is where you can view and manage it.
- Content Studio
The Content Studio allows you to build and store creative assets to use in your emails. It’s also where you can connect your Instagram account and store your logo.
- Integrations
This is pretty similar to an app store, and it’s where you can integrate your Mailchimp account with other applications such as Facebook, Google, or an ecommerce platform.
- Search
This one needs very little explanation – it’s where you can search for anything within your campaigns and contacts!
At the very bottom of the toolbar, you’ll also find a circular icon with your first initial in the middle. This allows you to access your account settings. From here, you can manage your notifications, edit your profile and account, and find the option to upgrade your account or hire an expert if you want to.
#2. Integrating Mailchimp With Your Website
- How to integrate Mailchimp with your website
- Other integrations on offer
Mailchimp is a great email marketing tool to use in conjunction with an already-established business. In this digital age, the chances are you’ll already have a business website up and running, so integrating the two is a great way of funneling your visitors into your email list.
Connecting Mailchimp to a third-party platform is easy. First, head to the ‘Integrations’ tab at the bottom of the left-hand toolbar. Next, search for your chosen provider. In this instance, we’re going to connect to Squarespace.
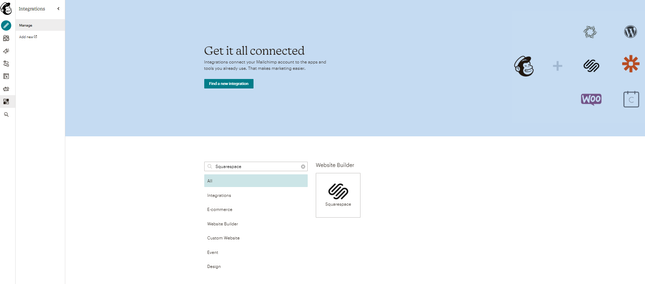
Once you’ve selected your platform, Mailchimp will ask you to enter your website’s URL. It will then generate a custom code that you can paste into your website’s HTML. Once that’s done, you can check the connection by clicking the button underneath the code box.

Mailchimp offers a number of integrations. These are split by industry, making it easier for you to find the one you’re after. Its largest selection sits underneath the ecommerce umbrella, giving you the chance to connect with platforms such as BigCommerce, Magento, Volusion, WooCommerce, and many more.
You can also connect your Mailchimp account to Facebook, Google, Twitter, and Eventbrite, to name but a few of the other options on offer.
#3. Building Lists and Creating Signup Forms
- How to import existing lists
- How to build signup forms
Before you can start creating emails, you need someone to send them to. This is where your contact list takes center stage.
Mailchimp gives you several ways to collect email addresses and build your database. Below, we’ll provide instructions for each.
First, head to the ‘Audience’ tab. This is the second icon in the left-hand toolbar, underneath the ‘Create’ heading. At the top of this page, there’s a header inviting you to ‘Grow Your Mailchimp Audience’. Click the ‘Add Your Contacts’ button underneath this.
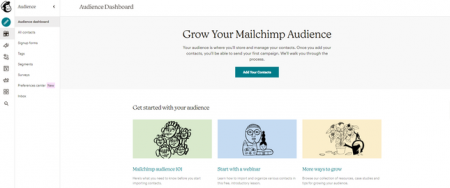
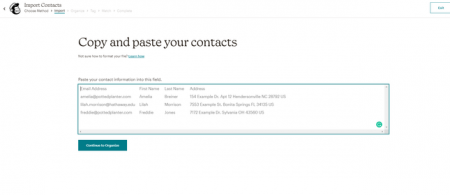
Selecting this option will take you through a series of upload steps. The first page will ask you to choose how you want to upload your contacts. You’re given the option to choose between manually copying and pasting them, or uploading them as a .csv file.
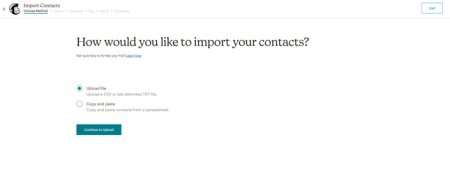
If you opt for the .csv option, Mailchimp will direct you to select the file from your computer for uploading. However, it’s a bit more complicated if you choose to copy and paste. That’s because you’ll need to make sure you format your information as it’s shown in the box provided. This means putting the email address first, followed by the first name, last name, and address.
If you’re a little confused, don’t worry. Mailchimp provides a formatting guide that can be found above the ‘Copy and paste’ box.
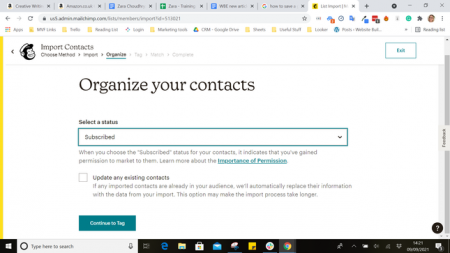
Mailchimp will then prompt you to select a status for your new contacts from a drop-down menu. You’ll be able to assign them as subscribed, unsubscribed, non-subscribed, or cleaned. Setting them as ‘Subscribed’ means that you’ve gained their consent, and they’ve agreed to receive emails from you.
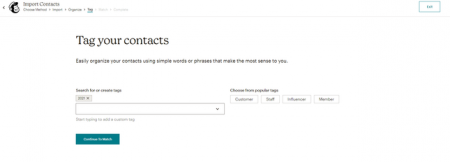
You can organize your new subscribers even further by giving them tags. These tags allow you to structure your lists in a way that makes the most sense to you. For example, you might attach the ‘2021’ tag to contacts if that was the year they joined your mailing list. You can use Mailchimp’s suggested tags, or, alternatively, you can come up with your own custom ones.
The final step in getting your contacts uploaded is checking that Mailchimp has recognized all of the data you’ve entered, whether you’ve uploaded it via .csv or through manual copy and paste. It will tell you the number of columns that have been recognized and alert you to any errors, so you can fix them before completing the process.
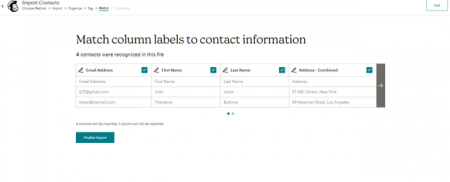
Once you’re happy with this, hit the ‘Finalize Import’ button. Cast your eye over the final review page to make sure you haven’t missed anything, and then click ‘Complete Import’. Mailchimp will let you know if your import was successful, along with the number of contacts that were successfully uploaded.
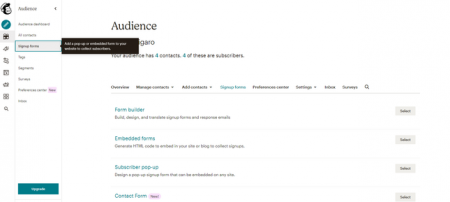
Using the Form Builder
To create a signup form, you’ll need to use the form builder. Selecting this option will take you to an editor containing a default form template. There are a lot of fields in this form that you might not want or need, such as address, phone number, and birthday.
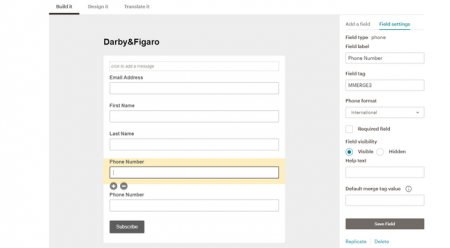
To delete a field, click on it to open the field settings menu on the left, and then select the ‘delete’ button at the bottom. This will cause a box to pop up, and you’ll need to manually type the word ‘DELETE’ in the text box to confirm. Alternatively, you can press the minus icon that appears in the form, underneath the field.
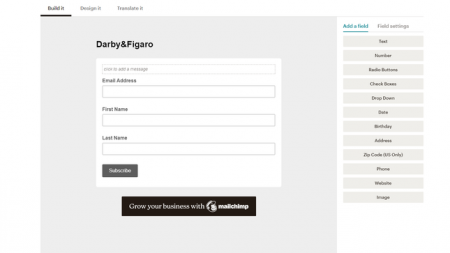
You can also add a new field by using the ‘Add a field’ tab. Click on anything you’d like to insert, and it will automatically appear in the form. Once you’re happy with the result, you can share the form with your network by copying the link located at the top of the page.
Embedding a Form
If you want to embed a form into your existing website, click on ‘Embedded forms’ in the ‘Signup forms’ tab. This takes the form you’ve created in the Form Builder, and turns it into HTML code.
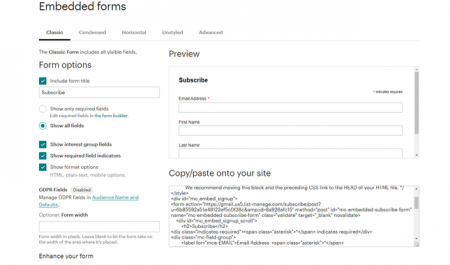
You can customize a few things on this page, such as how your form will appear (classic, condensed, horizontal, or unstyled). You can also use the checkboxes to decide what your subscribers will and won’t see, and you’ll have the option to enable GDPR fields.
Once you’ve made your selections, you can copy the code from the box in the bottom right corner, and paste it into the relevant area on your website builder, embedding it into your web page.
Good to know…
‘GDPR’ stands for General Data Protection Regulation. This is a European data protection regulation that governs the management of personal data. GDPR doesn’t affect emails sent within the US – but it’s still good practice to cover your bases and collect data consent, just in case any of your subscribers live in Europe.
Creating a Pop-up Form
Featuring a pop-up subscription box is a popular way of collecting email addresses, and you can create your own by selecting the ‘Subscriber pop-up’ option in the ‘Signup Forms’ section of the toolbar. This will take you to a pretty straightforward editor, where you can use the limited menu on the left to change the font, layout, and settings of the pop-up.
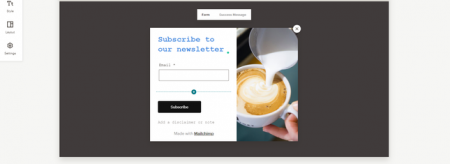
Once you’re happy with how your design looks, you can click ‘Save and Publish’. However, you won’t be able to complete this step if you haven’t already connected your website to Mailchimp. Don’t worry though – you’ll be prompted to do so at this point.
Once the integration has been successful, Mailchimp will save the pop-up design and publish it on your website, so potential subscribers will see it when they visit.
Expert Insights
 ‘As a blogger, email marketing is probably my biggest draw outside of social media when it comes to getting the audience to come through to my website. Mailchimp has always been a tool I can trust, allowing me to make sure that my audience is up to date, and that my content is presented as professionally as it is on social media or my website.
A feature I find extremely beneficial is the audience separator, where you can assign specific lists of people, ensuring you are only engaging with the people who want to see certain content. I typically keep my entire audience up to date on new posts, but if I am specifically working with a women’s getaway retreat, for example, it allows me to push this feature in an email specifically targeting my female audience, and so it doesn’t come across as irrelevant for the male audience who won’t see its value. If people don’t see value in your emails, that is when they will start to unsubscribe.’
Michelle Halpern is the founding editor and photographer behind the travel blog Live Like It’s the Weekend. In 2016, she left the corporate fashion world for a year-long, solo around-the-world trip and never looked back. Now, she’s based in Los Angeles and blogs full time, covering adventures in California and beyond with a tastemaker’s sensibility.
#4. Creating an Email Template
- How to create an email template
- How to use Mailchimp’s editor
Now for the fun part – creating your very first email template!
Before we get started, it’s worth noting that email templates aren’t emails… yet. They’re just the basic outlines you create that will become emails further down the line.
For example, you might create a generic newsletter template, but before you can send it, you’ll need to edit it and add in the relevant text – only then can you schedule it to send to a group of users. Templates are really just a starting point, but if you have a few of them ready to go, you won’t need to start from scratch each time you want to create a new email.
To create your first template, select the ‘Create’ icon in the left-hand toolbar. This will take you to a creative dashboard, where you can choose what you’d like to begin building. Select ‘Email’ and then ‘Template’ from the sub menu options.
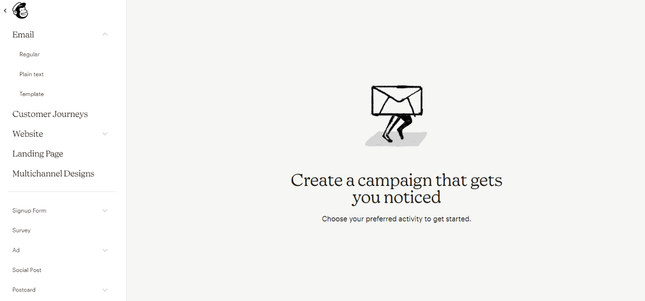
After you’ve clicked ‘Get Started,’ Mailchimp will give you the option of picking a layout to – you guessed it – get started with. You can choose a basic template or one of the more advanced featured layouts, such as ‘Sell Products’ or ‘Follow Up.’
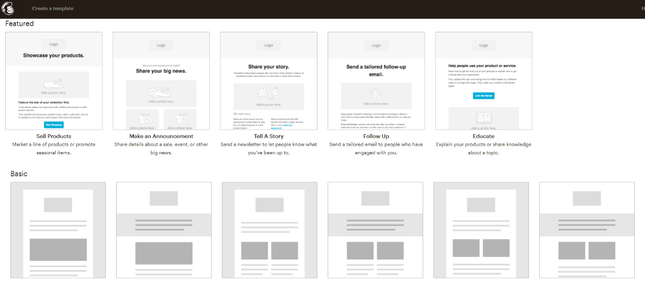
If you want a bit more than a blank layout, Mailchimp also has a set number of themes. These are prepopulated with images and colors, and are sorted by industry or purpose. Alternatively, if you find that the layouts are too prescriptive, you can choose to code your own email. We only recommend this option if you’re comfortable with coding, though! (Read about how to view html code in Mailchimp)
If you’ve picked a template that only features single-column blocks, don’t worry – you can add these in manually once you start editing. Drag a text box in and place it where you want it, then click on the ‘Settings’ tab. Here, you can select either one column or two. If you want to feature two images alongside each other, use the ‘Image Group’ element, rather than the single ‘Image’ one.
Customizing Your Template
When you’ve found a layout you want to use, you’ll be directed to Mailchimp’s editor. It might not be the most intuitive, but once you’ve had some time to explore and play around with it, you’ll find that it’s not as complicated as it first looks.
It works on a drag-and-drop principle. This might sound like a questionable 70’s dance move, but it actually just means you can add elements into your design by dragging them from the left toolbar, and then dropping them where you want them.
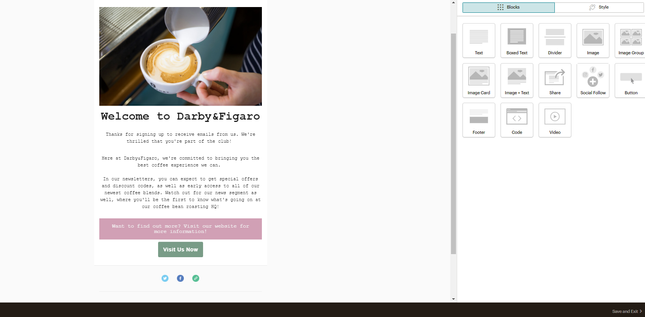
Although you’ll be dragging the elements in, this is mainly just to give you an idea of what the email will look like when you’re finished. Lots of the actual editing still happens in the left toolbar. For example, once you’ve inserted a text box into your template, a corresponding text box will appear in the toolbar, where you’ll enter your text and set the font, color, and size.
If you want to include a text box with a colored background, like the one in the image above, select the ‘Boxed Text’ element. This will allow you to set a background color of your choice.
Mailchimp also allows you to upload your own graphics, so that the branding of your emails is consistent with that of your overall business. You can import gifs from Mailchimp’s Creative Assistant, too.
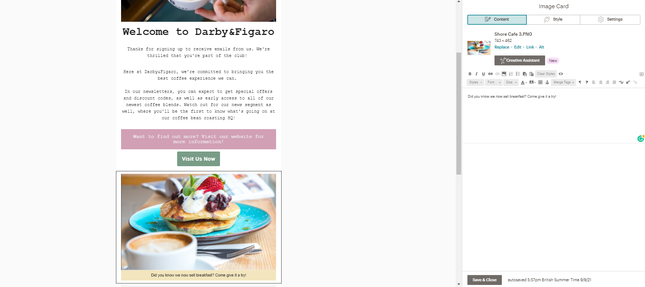
In the editor, there are a few ways to add images. You can either add a single image, an ‘Image Card’ with a related caption, or ‘Image + Text’. This last option is particularly handy, as it means you can do two things at once, rather than having to drag multiple content blocks in.
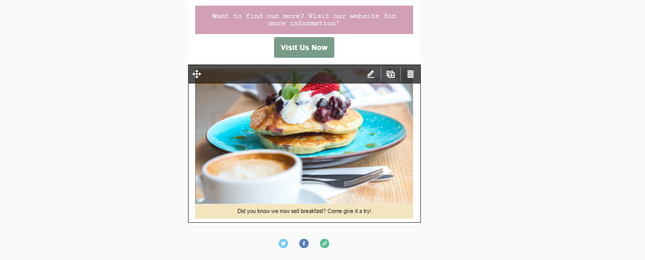
If you add something into your email, and then decide you want to remove it, just hover over the content block until the translucent grey banner pops up. This features an edit pencil, a ‘Clone’ button, and a ‘Trash’ button. Hitting this last icon will delete any unwanted content.
When you’re finished with your template, press the ‘Save and Exit’ button in the bottom right-hand corner. At this point, you’ll be prompted to name your template. We recommend choosing something descriptive, such as ‘Welcome Email,’ so you can easily identify it in the future. It’ll also make the template easier to find when you come to view it in the ‘Campaigns’ tab with the rest of your email designs.

#5. Creating a Campaign
- What a campaign is
- How to create one
- How to track its performance
In Mailchimp, when we talk about creating a campaign, we’re not just talking about emails. The term ‘campaign’ refers to a combination of all of the marketing tools the platform offers, including ads, social posts, and landing pages. To start building your first campaign, you’re going to need to head to the ‘Create’ tab.
How to Create and Send a Regular Email Campaign
In the world of Mailchimp, a ‘regular’ email is a standalone email send. This just means that it isn’t sent as part of a sequence, or in response to a user action, but is sent manually. This kind of email is particularly useful if you want to send a one-off announcement or promotion.
To create a regular email, select the ‘Email’ drop-down menu in the ‘Create’ tab, and then click ‘Regular.’ Next, give your campaign a name.
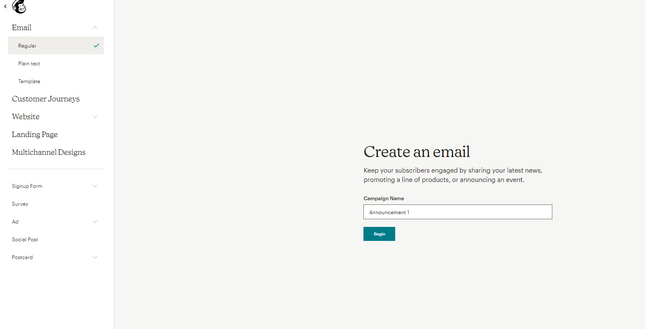
Underneath the regular email option, you’ll see another send type called ‘Plain text.’ This is exactly what it sounds like: an email containing text only, with no colors, graphics, or fancy fonts. Although this might sound boring, these emails are a useful email marketing tool, especially if you need to convey important information to your subscribers and don’t want lots of distracting graphics.
Next, you’ll need to decide who you’re going to send your email to. It will automatically input your full list, meaning that all of your subscribers will be set up to receive it. However, if you only want to send to a segment of your users, you can click ‘Edit recipients’ and then refine your audience.
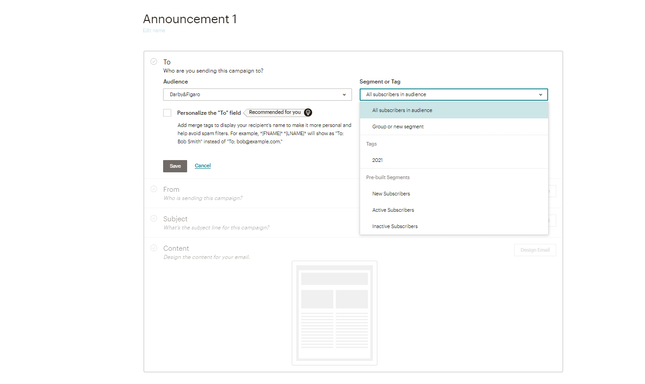
Within the ‘Edit recipients’ tag, you’ll also see a small tick box that’s labeled ‘Personalize the ‘To’ field.’ We recommend selecting this. It will use merge tags to input your recipients’ personal data, automatically populating the ‘To’ field in your email. For example, it will appear as ‘To: Jordan Glover,’ instead of ‘To: jordanglover@ websitebuildingguide.com.’ This looks nicer, and it’ll help your emails get past those pesky spam filters!
Once you’ve set your audience, edit the ‘From’ field, so your users know who’s sent the email, and add in a catchy subject line to encourage them to open it. The last thing to do is design your email content!
Mailchimp is currently trialing a new editor, so you may be offered the option of testing this new Beta version out when you click the ‘Design Email’ button. The new editor doesn’t use the same drag-and-drop mode that you may be familiar with, so it might take a while to get used to. We recommend sticking with the classic editor for now if you’re unsure.
Editing your content works in the same way as building a template. You’ll first be invited to select a layout, or, if you’ve made your own set of templates, you can choose one of those. You’ll then be taken to the editor, where you can let your creative juices flow!
Expert Insights
 ‘At WinIt we use Mailchimp to help organize our email marketing. When we are getting ready to launch a new campaign, Mailchimp makes things easy and keeps our newsletters organized.
My advice to new users of Mailchimp is to keep your email copy clear and concise. Mailchimp can help with much of the newsletter process, but if the wording of your marketing is off, there is little use in using Mailchimp’s services.’
Ouriel Lemmel is the CEO and founder of WinIt, an app that helps millions of drivers manage and dispute parking tickets.
How to Use Merge Tags
Personalization is a key part of modern email marketing, and it’s not something you can afford to ignore. In fact, personalized email messages have a 14% higher click-through rate than those that are more generic. Don’t worry, though, we’re not expecting you to trawl through your email list and manually add everyone’s first name.
That’s where merge tags come in.
These little snippets are essentially coded text, and when you insert them into your email copy, they pull dynamic content into your email. Let’s look at an example.
One of the most common tags is the ‘*|FNAME|*’ tag. This pulls through a user’s first name, helping the email to feel more personalized. You can also use the ‘*|LNAME|*’ tag, which will insert their surname, too.
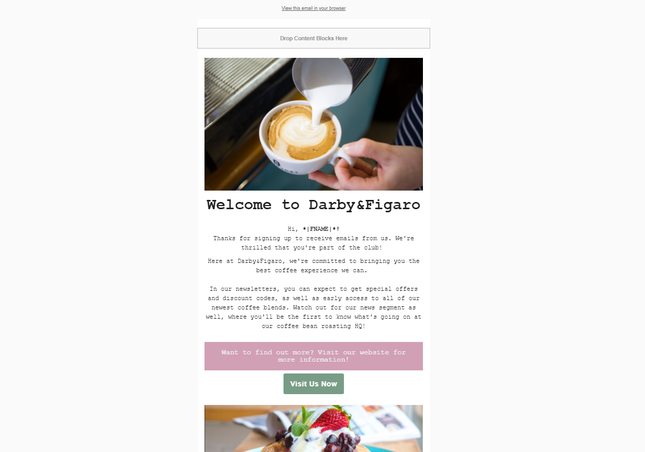
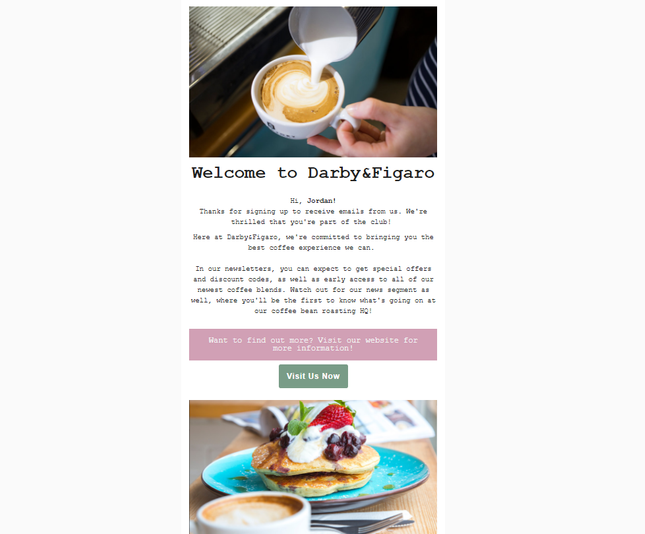
However, a merge tag will only work if there’s data in the field it relates to. For example, you won’t be able to use *|FNAME|* if you don’t ever ask your users to provide their names.
You can get around this by setting a default value. This means that if you don’t have any data for a particular user, your copy will populate the field with a more generic term. For example, if you set the default value to ‘Coffee Lovers,’ then when you write ‘Hello, *|FNAME|*’ without a user’s first name in the database, the email will instead read, ‘Hello, Coffee Lovers.’
Of course, this won’t work for everything – it’s tricky to come up with a default value for an address or a birthday!
To manage the default values for your merge tags, head to the ‘Audience’ tab and select the ‘Manage Audience’ drop-down menu in the right corner. Select ‘Settings’ and then ‘Audience fields and *|MERGE|* tags’.
There are plenty of tags that you can use to give your emails a personalized spin, but luckily, you won’t need to memorize them all. Mailchimp has provided a handy merge tag cheat sheet, containing a glossary of all the tags you could possibly need!
Sending Your Campaign
Once you’re happy with your email design and your audience list, it’s time to hit that send button. But not so fast! Before you commit, it’s always a good idea to send yourself a test email, using the link underneath the content preview. Zac Surprenant, the Marketing Director at BPKC, recommends doing this every time you send an email:
‘For new users, my only recommendation is that you make good use of the draft feature, which allows you to send yourself a copy of the email before sending it out to the consumer. Make sure to do this every time you make a change, so you get it perfect before it goes out. I would also recommend sending it to a colleague for a fresh pair of eyes that can spot any mistakes you made.’
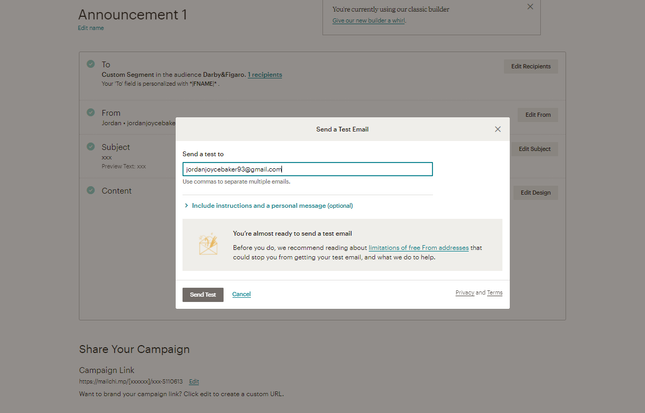
When you’re happy that there aren’t any mistakes in your design, you can send it out to your list or segment. There are two ways to do this: you can either hit the ‘Send’ button and send it immediately, or you can schedule it to send at a later date. Unfortunately, the scheduling feature isn’t available on Mailchimp’s free plan, so you’ll need to upgrade if you want this functionality.
Tracking Your Email’s Performance
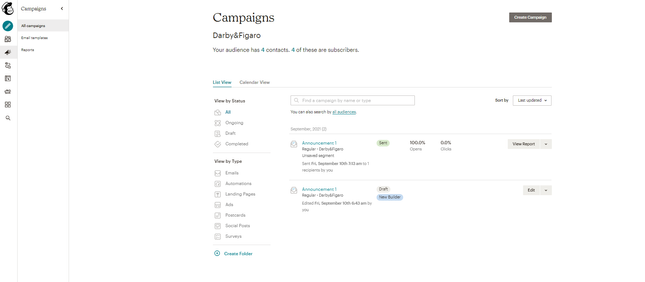
As soon as your email leaves Mailchimp and begins winding its way to your recipients, it’s time to start tracking its performance. Why? Well, an email takes a lot of time and hard work to create, so you want to be sure that it’s worth the effort. This also allows you to see where you might be able to improve next time.
You can view your performance metrics in the ‘Campaigns’ tab. Here, you can check the opens and clicks at a glance, or download the full report to give a more in-depth analysis.
Further Reading
Want to make sure that your email campaigns are the very best they can be? Check out our 11 Email Marketing Best Practices.If you’re wondering when you should be sending your emails, we answer the question ‘When is the best time to send a marketing email?’ in our guide!
#6. Using Automation
- What is automation?
- How to set up automated workflows on Mailchimp
When we talk about automating your email sends, we’re not talking about employing a little robot to send them for you. Well, we sort of are, but don’t worry, you won’t need to deal with a small tin man running around your house. This kind of automation comes included with your Mailchimp plans and is controlled by workflows that you build and monitor yourself.
These workflows are designed to send specific emails in response to a subscriber action. For example, a customer might receive a series of emails when they subscribe to your mailing list. Triggered sequences are also commonly used if a customer abandons their cart without checking out – a friendly email will be sent as a reminder.
Mailchimp calls these ‘Customer Journeys,’ and you have two ways of accessing its Customer Journey builder – either through the ‘Create’ tab, or in the ‘Automations’ tab further down the toolbar. Either one will take you to a page where you can choose a premade map, or start building your own workflow from scratch.
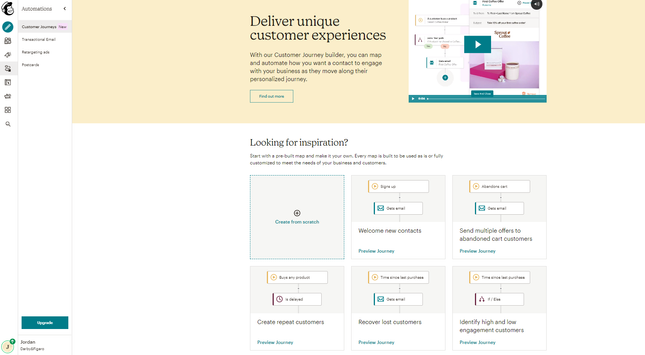
Although these premade options can save you a lot of time, we’ll give you a quick tour of the builder, just in case you want to create your own from the ground up.
Heads up!
To enable Customer Journeys, you’ll need to upgrade to a premium paid plan if you’re currently using a free one.Once you’ve selected ‘Create from scratch’ and given your workflow a name, you’ll be asked to choose a starting point. This will be the action that sets off the sequence, and causes a subscriber to be added to the journey. For this instance, we’re going to select ‘Signs up.’
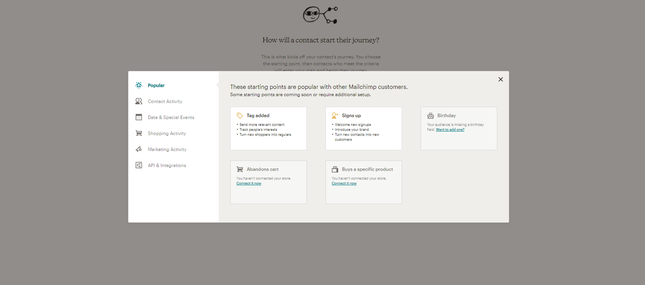
Don’t worry if you’ve already imported a list of new subscribers into Mailchimp. When setting up your sequence, you’ll have the option to add them to the workflow as if they were fresh subscribers.
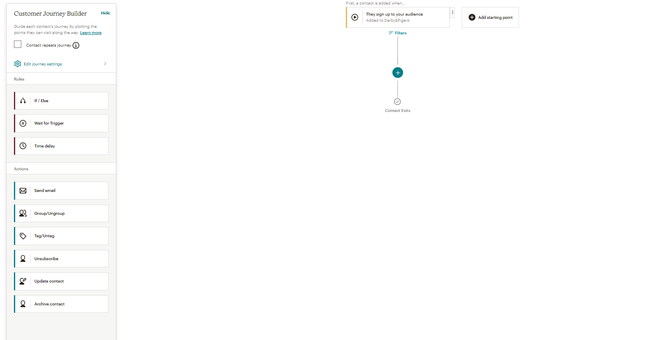
When you’ve selected your trigger, you can start to build your customer map. To do this, you’ll need to use the toolbar on the left side of the builder. From here, you can insert either rules or actions. The rules determine how a user moves through the map, using segmented data. Once a user has been filtered through these requirements, you can then input an action dependent on their journey.
To add rules or actions, click the ‘+’ symbol in the builder, and then select the element you want to add. When you add a rule or an action, you can edit it by clicking on its box in the workflow. A box will then pop up, allowing you to change the parameters of the rule or action.
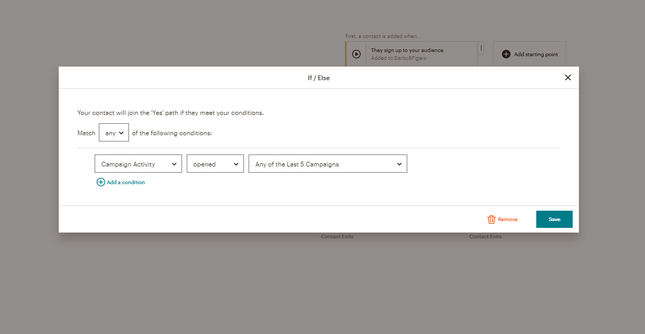
Take a look at the example customer journey below:
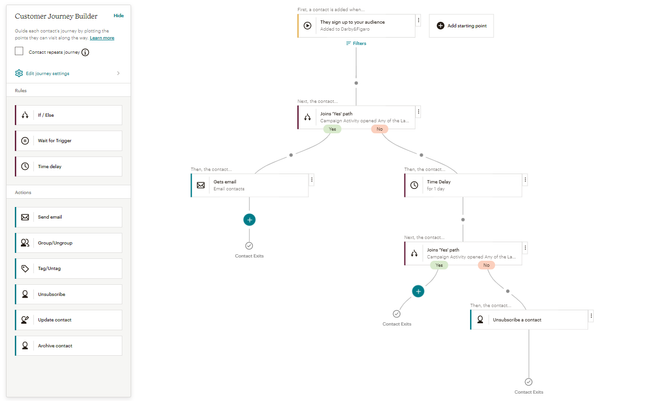
The workflow begins when a user is added to the journey. They then pass through an If/Else filter, which checks whether they’ve opened any emails in the last five days. If the answer is yes, they’ll receive an email containing a promotional code. If the answer is no, they’ll be delayed for a day, before entering another If/Else filter checking if they still haven’t opened anything. If the answer to this query is no, they’ll be unsubscribed from your list.
It might look complicated, but building a customer journey follows a very logical path, and it goes a long way to helping you manage your workload. Individually making and scheduling emails to send is an arduous process, especially when you need to make sure the right email goes to the right person – at the right time. Using automation makes everything much simpler, and we recommend using it where you can!
#7. Setting up A/B Testing
- What an A/B test is
- How to set one up on Mailchimp
If you haven’t heard of the term ‘A/B testing’ yet, it’s about time you got familiar with the concept. That’s because it’s a central part of email marketing, and will play a big part in helping you figure out your overall sending strategy.
What Is A/B Testing?
A/B testing is where you split your audience into two sections – a section A and a section B. You then send both lists two different variations of the same email to test which version they respond better to.
For example, you might want to try two different subject lines to see which one achieves a higher open rate. Conducting an A/B test can give you the answer without forcing you to put all your eggs in one basket, allowing you to try out some risky new strategies!
How to Create an A/B Test on Mailchimp
Before you get started…
We just wanted to note that A/B testing isn’t available for all Mailchimp users. You’ll need to be on the Essential plan at the very least to access this feature, which starts from $9.99 per month.To set up an A/B Test, select the ‘Create’ tab, and then click ‘A/B test’ in the ‘Email’ sub menu. You’ll then be prompted to name your email campaign, after which you can select ‘Begin.’
Just like when you’re creating a normal email, select the list or segment that you’re going to send your campaign to. After this point, however, things will start to look a little different.
Before you get started…
Good to know…The more contacts you have, the more trustworthy your A/B test results will be. You can still set them up for smaller samples, but the bigger the better.
Mailchimp will prompt you to select the variable you’d like to test, giving you four options to choose from: subject line, from name, content, and send time.
Before you get started…
Top Tip!It can be tempting to select a ton of variables when setting up your tests. However, we recommend just choosing one. This is because if you change lots of different parts of your email and it wins the test, you’ll have a harder time figuring out which part was responsible. Sticking to just the one variable means you can say for sure whether your change has had an impact on subscriber engagement.
When you’ve selected your variables, you can then choose how many variations of your email you’d like to send. Traditionally, an A/B test has two variations, but you can send up to three. You can use the plus button under your variables to adjust this.
Next, use the slider to decide which percentage of your subscribers are going to be included in the test sample. This needs to be over 10% of the total amount of your database, and if you’re testing send time, make sure to select 100%, or else the test won’t work properly!
There are lots of different ways for you to determine a winner, be that through open rate, click-through rate, or something else. For your test to work, you need to tell Mailchimp exactly how you want success to be judged, so in the next section, select your winning metric and how long you want the test to run for.
Now it’s time to actually decide what your variations will say and/or look like. You’ll be prompted to enter the different versions of your email. For example, if you’re testing three different subject lines, this is the part where you need to type all of them out!
From this point onwards, you’ll be able to set your email up as if it were a regular campaign. Choose your template and edit the content until you’re happy with it. If your variable is your content, you’ll have the option to edit and preview each variation before sending.
For each version of your email, you can set a brief description to remind yourself of the changes you’ve made – don’t worry, though. Your subscribers won’t see this part!
The last thing to do is confirm and send, or schedule, your A/B test and wait for the results to come rolling in! You can check all of your data and stats for your tests in the report for the campaign you were testing. This is also where you can select a winner underneath the ‘Finalize your test’ section. Mailchimp will then automatically send the winning variation to all of your recipients.
How to Use Mailchimp: Summary
Phew! Well done for making it through to the end of our beginner’s guide to Mailchimp. You now have everything you need to create your own Mailchimp account and start shaping your email marketing strategy. Here’s a quick overview of everything we’ve covered in this article:
- Registering With Mailchimp
- Integrating Mailchimp With Your Website
- Building Lists and Creating Signup Forms
- Creating an Email Template
- Creating a Campaign
- Using Automation
- Setting up A/B Testing
Email marketing takes patience and a lot of hard work, but the rewards are well worth the effort. We wish you the best of luck building your email list and creating campaigns that represent your business and brand. Make sure to come back and let us know about your experiences in the comments section below!
FAQs
We’d recommend going for the Mailchimp Essentials plan at the very least. This will set you back $9.99 per month, but will give you plenty more features to play with.
The Essentials plan allows you to send up to 500,000 emails, the Standard plan up to 1.2 million, and the Premium plan which offers up to 3 million. However, it’s worth bearing in mind that the more emails you can send, the more you’ll need to pay per month.
If you’d like more information on the tools Mailchimp offers to help your email marketing strategy stay compliant, you can check out its GDPR guidelines.


2 comments