How to Change a Domain Name in Just 4 Simple Steps
If you click to purchase a product or service based on our independent recommendations and impartial reviews, we may receive a commission. Learn more
A domain name is a crucial part of your branding when building a website. It sticks with your business for years and – barring any major rebrand or upheaval – is unlikely to change at all.
However, there are cases when a domain name may not have been chosen carefully at the first time of asking. You might discover, for example, that your domain name overlaps with another business, or doesn’t resonate with your audience.
In such scenarios, it’s better to switch to a new, more meaningful domain name that reflects your core values, branding, and company image. However, this transition to a new domain name should be done in a way that minimizes any damage to your brand and website traffic. So buckle up, because this is exactly what we’ll be walking you through in this post – in just four simple steps!
How to Change Domain Name
1 Backup Your Website
To ensure that your domain change goes smoothly, it’s sensible to backup your website first. A backup is a copy of all the files associated with your website, which can be used to restore your website if something goes wrong.
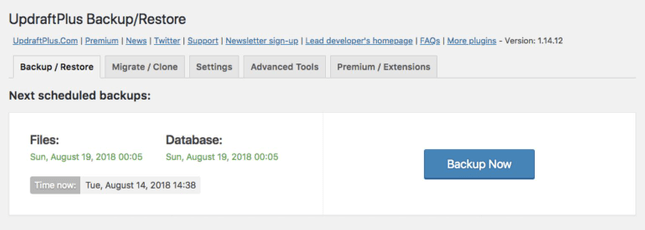
If you use a modern, high-quality hosting plan, your web hosting provider may already have an automatic backup system in place. If not, there are many third-party services and plugins you can use to make a backup. For example, one of the most popular WordPress backup plugins is UpdraftPlus.

You can use this plugin to back up your website on a set schedule, or just before you start the domain change process. You can also arrange for the backup files to be sent to a cloud storage service of your choosing, such as DropBox or Google Drive.
Things to do before moving on to the next step:
- Enable automatic backups if your web host provides them
- Pick and activate a 3rd-party backup service or plugin
2 Register a New Domain Name
The next step is to purchase your new domain name and link it to your website. Here are some tips to help you pick a good domain name:
Consider your product: Take some time to think about what exactly are you selling, and how it benefits your target audience. Whether it’s a product or service, a brainstorming session can help you come up with related words and domain name ideas.
Take future vision into account: When choosing a domain name, it’s not a good idea to pigeonhole it into a single concept. For example, if you pick bookshop.com, and later decide to sell products other than books, you will confuse your visitors. Consider a name that isn’t directly associated with the items you’re selling.
Keep it short and memorable: Your domain should be concise, as well as easy to recognize, pronounce, and spell. For example, if you announce the name on a radio channel or podcast, there should be no need to spell it for the listeners.
Once you have come up with a name you like, it’s time to purchase it using a Namecheap.

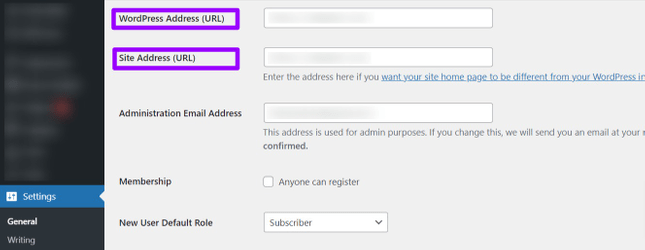
You may also need to configure the domain name settings in your website’s administration area. For example, if you’re using WordPress, go to Settings —> General screen and change the URL. The fields you need to fill are WordPress Address and Site Address.

However, keep in mind that once you do this, your admin backend won’t be accessible until you complete the remaining steps. For more details on all the steps you need to complete, make sure to check your hosting provider’s knowledge base.
Things to do before moving on to the next step:
- Register and point the new domain name to your website
- Change website URL in WordPress settings
3 Redirect Your Website’s Pages to the New Domain
Even when your website’s domain has changed, your job isn’t yet finished. There may be many links throughout your own content, or across other sites on the web, that point to your website’s old domain name.
Luckily, there is a way to permanently redirect these old links to the URLs associated with your new domain name.
If you’re using the WordPress CMS, setting up these redirects is easy. Simply log in to your website files via FTP and look for a file known as .htaccess. This is one of the WordPress configuration files that you will need to edit.
Open the file for editing and add the following code snippet:
RewriteEngine on
RewriteRule ^(.*)$ http://www.example.COM/$1 [R=301,L]
In this code, replace the string that says example.com with your own new domain name, and voila – your redirect is good to go.
There’s just one more thing you’ll need to do — inform Google that you have updated your website domain. Assuming that you’ve already set up a Google Search Console account, you can use the Change of Address tool to move your website from one domain to another. It’s also a good idea to check your web host’s knowledge base, to ensure that you’re not missing any crucial steps involved in the process.
Things to do before moving on to the next step:
- Edit your HTAccess file to set up 301 redirects
- Update Google Search Console using the Change of Address tool
4 Update Your Website’s Branding
At this stage, you’re all done with the technicalities of changing your website’s domain name. Now, it’s time to update your audience about the change in your brand name. Not doing so will confuse both new visitors and regular readers – so it’s important not to skip this step!
Depending on how well-known your brand already is, you may even need a full-blown rebranding campaign. Here are some essential steps for you to consider:
- Update your website logo and header
- Update the pages on your website that mention your brand name, such as About page, Contact page, etc.
- Update sections of your website that mention your brand name, such as footer, website description settings, and so on.
- Write a blog post announcing and explaining the change in domain name.
- Update your social media pages and profiles.
- Write a social media post for each platform you’re active on.
- Send an email to your members or subscribers describing the new change.
By proactively seeking opportunities to update your users about your new domain name, you’ll be able to retain most of your traffic and customer base.
5 Summary: How to Change a Domain Name
As you can see, the process of changing your website’s domain name can be surprisingly simple – if, that is, you know what you need to do (and how).
Once you’ve purchased your new domain name, all you need is to change the primary URL and alter some technical settings. To recap:
- Backup Your Website
- Purchase a New Domain and Register it to Your Website
- Redirect Your Website’s Pages To the New Domain
- Update Your Website’s Branding


Leave a comment